
How To Set Up A Gorgeous Gallery Wall Full Of Plates — Easy Steps & Tips
Posted by APARNA RAMACHANDRAN

Gallery walls are stunning additions to home decor; they spruce up bland walls, help inject personality into your interior, and easily make a head-turning focal point.
*

For folks wishing to move a step further than the traditional photo gallery walls, using colorful decorative wall plates is a fantastic idea!
*
But curating the perfect gallery isn’t just about hanging a set of wall plates.

There’s so much more forethought and effort put in to create a look that works cohesively as a single visual piece, so each plate complements — while not overpowering — the overall aesthetic.
*
In that regard, we’ve put together a comprehensive step-by-step guide on how to set up a gorgeous gallery wall full of plates. Stick till the end for helpful tips!
*
Steps To Creating A Gallery Wall Full Of Plates

Without further ado, let’s pen down an easy step-by-step guide for you to follow to curate your dream gallery wall using a set of wall plates!
*
1. Identify The Wall
The first step is finding your colorful decorative wall plates the perfect wall (read: home). Plate walls are ideal for any space in your home; from hallways to staircases, they can bring pretty much every bit of your home to life.

We recommend choosing a space that you often use — such as the living room — so you can leverage the view of your set of wall plates the most! While choosing the wall, pick one that you’d like the attention to be centered at. For most folks, this would be the space above the main sofa.
Pro tip: If you have a mirror in your space, preferably choose the wall opposite it, so the view reflected by the mirror is worthy.
*
2. Define The Frame
Next, define the ‘frame’ — the amount of space your gallery wall will occupy. A good way to start is by leaving a set amount of margins on either side, allowing the central space to be the frame.

If you’re hanging your wall plates on an empty wall, aim for the center of your setup to be at eye level, which is around 58 inches above the floor (it can, of course, vary according to your height). If you’re working with a wall behind a furniture piece, aim for the bottom of the lowest frame to be at least 7 inches above the furniture as hanging it too low can create an illusion of clutter. Additionally, try to cover around two-thirds of the top silhouette of the furniture.
In both cases, the horizontal placement should ideally be in the center of the empty wall space.
*
3. Finalize The Number Of Plates Required

From 3 to 300, the number of plates to use is very flexible. If you’re a rookie designer, a good place to start would be purchasing a pre-curated set of wall plates. If you’re working around a bigger space, you can increase the number of plates accordingly.

*
Regarding the colours, there are plenty of options to choose from — from laid-back black decorative wall plates to more colorful sets, there’s a little something to suit everyone!

*
4. Plan Your Design
Once you’ve collected the wall plates to use, it’s time to plan the design layout. Place the plates on the floor (or any flat surface) and move them around to see which arrangement suits your taste best. You can either opt for a more uniform grid (helps with OCD, too! *wink*) or add the perfect touch of asymmetry by choosing a slightly haphazard layout.

*
Ideally, allow 2 to 4 inches between all plates. We’d recommend allowing enough room on the edges of the layout so you can add more as you find further pieces you love down the lane. Try different layouts and once you’re happy with the result, click a picture of it (we need it for our next step).

*
5. Replicate The Planned Arrangement & Visualize
Transfer the layout from your photograph onto the wall. For this purpose, trace each one of your plates onto paper/cardboard. Cut the pieces out to form cut-outs, labeling each piece along the way.
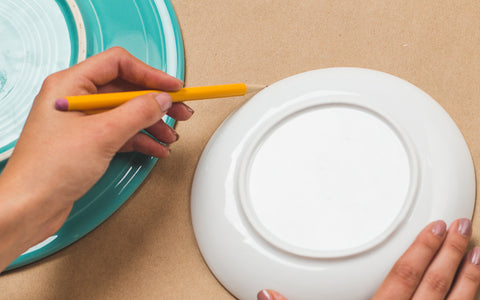
For your convenience, we’d be happy to send over paper cut-outs along with your plates (available upon request). Finally, stick these to the wall (you can use a low tack cellotape to achieve this), replicating the arrangement you envisioned earlier.
*
6. Allow Yourself Time To Decide
Allow the arrangement to stay overnight (or more), focusing on how you like it whenever you pass by. You can also take second opinions from loved ones.
 Remember, you can move the cut-outs around as many times as you wish — now is the time for experimentation. Finalize the arrangement only when you know you’re sure you’ll love the end layout!
*
7. Tap In The Nails
We’re almost there! Once the arrangement is finalized, mark your nail placements on the paper. You can check the back of your plates to get an estimate of where this would be.

Next, hammer (or drill) a nail right through the paper and straight into the wall, removing the paper afterwards.
*
8. And Hang The Plates!
Finally, hang the plates in their respective positions. You should do this one by one, that is, tap in one nail and hang the plate to be fixed there, tap in the next nail and the next plate, and so on. This helps visualize the gallery wall all along the process, in case you need any last-minute alterations to the positions.

During the process, be sure to secure the initial plate with a metallic wire (which is provided alongside our plates) before hammering the next nail. This will make sure the first plate doesn’t fall off because of the shake/movement.
*

Once the process is complete — voila! Your very own gallery wall featuring a set of wall plates is up and ready.
*
Useful Tips To Remember
Before you get to setting up your gallery wall full of plates, here are a handful of tips to remember that will help you along the way:
📍 If you’re a beginner, consider choosing a longer/narrower wall for your plates as compared to a wider one. This creates a dramatic appearance, makes for a statement wall or beautiful in house photo-op, and is an easier frame to fill.

📍Cluster the wall plates together, leaving about 2 inches space between each plate.

📍To add a personalized touch and some intrigue to your gallery wall, toss in other items of interest. These could be souvenirs, artifacts, cup planters, photographs, and frames.

*
Final Words On Hand-Crafted Wall Plates Decor
Hand-crafted wall plates decor is a great way to spruce up your home, especially if you arrange them into a gallery wall. Using the steps (and tips) given in this blog post, you can create a gallery wall featuring a set of wall plates to step up your decor game tenfolds!

If you’re looking for a fun combination for your home, we have plenty of wall decor plates for sale. You can head over to our website and shop wall plates — including pre-made sets and individual plates you can join together yourself. Additionally, you can shop cup planters and other fun items, too!
*
Enjoying our content? Follow our page (@milestones_hwl) on Instagram and say hello!
